PSXHAX.COM website and domain for sale. Contact Us with your offer!

You are using an out of date browser. It may not display this or other websites correctly.
You should upgrade or use an alternative browser.
You should upgrade or use an alternative browser.
Create PS2 FPKG with Cheats & PS2 Classic GUI Guide by AngelDavil88
Following the Codebreaker Cheats for PS2 PKG Games tutorial, here is a simple guide to create PS2 FPKG (Fake Packages) with cheats and the PS2 Classic GUI with thanks to @Codester1389 for the initial cue.
PART PC
1. Download the All-in-one PS2 FPKG Cheats (18.4 MB) archive (All-in-one PS2 FPKG Cheats.rar - Mirror - 18.36 MB) and extract it to your desktop. The archive includes:
3. Open the "SYSTEM.CNF" file (contained in the "PS2LOADELF" folder) with a notepad and rename the first string in this way:
BOOT2 = cdrom0:\LNCF_999.99; 1
4. Open Cdvdgen.exe, click on "Create new project" and then on "CD-ROM Master Disc" (If your game extracted weighs less than 750MB) or on "DVD-ROM Master Disc" (If your game is extracted weighs more than 750MB)
5. Now move all the contents of the "PS2LOADELF" folder into the CD / DVD-ROM Generator program windows
6. Click on the "VOLUME" tab and enter in the "Disc Name" field the id of your game that you can always find in the "PS2LOADELF" folder (example: SLES21430), in the "Producer Name" field write PLAYSTATION and in the "license area" field choose the region of your game:
8. Open "cdvd_iml2iso_403.exe", click on "Open" button on the right, choose the iml file you find on the desktop and then click on the "iml2iso" button on the left and wait for the process of creating your game iso with cheats are included.
9. Install the PS2 Classics Gui V1 by clicking on the "PS4 PS2 Classics GUI.application" file.
10....
PART PC
1. Download the All-in-one PS2 FPKG Cheats (18.4 MB) archive (All-in-one PS2 FPKG Cheats.rar - Mirror - 18.36 MB) and extract it to your desktop. The archive includes:
- cddvdgen
- cdvd_iml2iso_403
- isobuster_install
- PS2 Classics Gui V1
- PS2LOADELF
3. Open the "SYSTEM.CNF" file (contained in the "PS2LOADELF" folder) with a notepad and rename the first string in this way:
BOOT2 = cdrom0:\LNCF_999.99; 1
4. Open Cdvdgen.exe, click on "Create new project" and then on "CD-ROM Master Disc" (If your game extracted weighs less than 750MB) or on "DVD-ROM Master Disc" (If your game is extracted weighs more than 750MB)
5. Now move all the contents of the "PS2LOADELF" folder into the CD / DVD-ROM Generator program windows
6. Click on the "VOLUME" tab and enter in the "Disc Name" field the id of your game that you can always find in the "PS2LOADELF" folder (example: SLES21430), in the "Producer Name" field write PLAYSTATION and in the "license area" field choose the region of your game:
- SLES \ SCES belongs to the Europe region
- SLUS \ SCUS belongs to the America region
- SLPS belongs to the Japan region
8. Open "cdvd_iml2iso_403.exe", click on "Open" button on the right, choose the iml file you find on the desktop and then click on the "iml2iso" button on the left and wait for the process of creating your game iso with cheats are included.
9. Install the PS2 Classics Gui V1 by clicking on the "PS4 PS2 Classics GUI.application" file.
10....
How to Compile and Build with Unity for PS4 FPKG by RetroGamer74
Hi everyone, I was finally able to compile and run packages using Unity, many of you ask to me how to do it so I wrote a tutorial which can also be found below.
I hope many of you join to the PlayStation 4 scene and help developing PS4 homebrew, or follow THIS guide via VitaHex covering how to setup Unity to develop PS Vita games
Also @jocover has made available both a Space Shooter.pkg and tank.pkg HERE for those interested!
Let me know if everything goes fine.
Best regards.
How To Build With Unity PS4 FakePKG
In order to build with success using Unity PS4 you need to be sure your setup is complete.
Setup
1. Install PS4 ***. There is a release out there you have to look for. (Krome Mods)
2. Install Unity 2017.2.0p2. (You have to look for the version capable to build for 4.55 PS4 release).
3. Install Unity PS4 2017.2.0p2 for the same release than Unity 2017 release.
4. You can also install Monodevelop from the preferences menu option within Unity Editor. You can, anyway, install Visual Studio as IDE.
5. Once PS4 *** is installed you have to replace the Publishing Tools which are located in PATH_SDK/ORBIS/Tools/Publishing Tools/ with the FakePKG tools you can download from: Publishing Tools.zip (4.6 MB)
6.- Create a Unity account if you still don't have one.
7.- Set the license. You can do this in first Unity startup, or in the Help menu, by selecting Manage License. Then, select Activate License, and set yours.
Building
1. Create a new project, or open an existing one, or just import one of the packages as samples you can also find out there.
2. When you ready to build the project select File -> Build Settings.
3. Set the window as show in next image.
4. Now click in Player Settings button on the bottom left side of the Build Settings window.
[ATTACH type="full" alt="How to...
I hope many of you join to the PlayStation 4 scene and help developing PS4 homebrew, or follow THIS guide via VitaHex covering how to setup Unity to develop PS Vita games
Also @jocover has made available both a Space Shooter.pkg and tank.pkg HERE for those interested!
Let me know if everything goes fine.
Best regards.
How To Build With Unity PS4 FakePKG
In order to build with success using Unity PS4 you need to be sure your setup is complete.
Setup
1. Install PS4 ***. There is a release out there you have to look for. (Krome Mods)
2. Install Unity 2017.2.0p2. (You have to look for the version capable to build for 4.55 PS4 release).
3. Install Unity PS4 2017.2.0p2 for the same release than Unity 2017 release.
4. You can also install Monodevelop from the preferences menu option within Unity Editor. You can, anyway, install Visual Studio as IDE.
5. Once PS4 *** is installed you have to replace the Publishing Tools which are located in PATH_SDK/ORBIS/Tools/Publishing Tools/ with the FakePKG tools you can download from: Publishing Tools.zip (4.6 MB)
6.- Create a Unity account if you still don't have one.
7.- Set the license. You can do this in first Unity startup, or in the Help menu, by selecting Manage License. Then, select Activate License, and set yours.
Building
1. Create a new project, or open an existing one, or just import one of the packages as samples you can also find out there.
2. When you ready to build the project select File -> Build Settings.
3. Set the window as show in next image.
4. Now click in Player Settings button on the bottom left side of the Build Settings window.
[ATTACH type="full" alt="How to...
Codebreaker Cheats for PS2 PKG Games PS4 Guide by Codester1389
So, this is my very first thread I've ever made on this site. Please take it easy on me if there are any typos. For those that have seen my video or reply to a previous Codebreaker thread, a lot of you should already know that I'm the first on all of the Internet to figure out how to get Codebreaker cheats working on PS2 PKG games for the PS4, PS4 Slim, PS4 Pro or whatever u have.
This method is literally almost identical to that of the PS3. Only difference is the fact that we are building a PKG file as an extra step. Process is the same if u wanna put Codebreaker cheats in ur PS2 games on a Jailbroken PS3 (again, excluding the PKG building part).
So here is a text tutorial for those that want it. I'll also post a video that lots of you probably already have seen, but just in case you haven't. THIS NEVER HAS WORKED FOR ME WITH THE PS2 CLASSICS GUI, SO MY ADVICE IS DON'T USE THAT. ONLY USE THE ORBIS PKG BUILDING PROGRAMS. Here it is (video at bottom):
Steps (all programs are free and given towards bottom of post in a link):
1. Extract ISO with ISOBuster (free) to a folder (let's say it's called XXX)
2. Rename wLaunchelf.ELF file to BOOT.09
3. Keep CodeBreaker.ELF named the same and don't touch it.
4. Drag the wLaunchelf.ELF that u renamed to BOOT.09 AND Codebreaker.ELF into the same folder as all the other files that was extracted from ISO (XXX folder is used)
Note: If using a PAL game, the original Codebreaker.ELF might not work, so use the 1 I provided in download link below that NOW contains "Xploder.ELF" as well that will work with PAL games. Folders are labeled in download for your convenience
5. Open the SYSTEM.CNF file (that was extracted from ISO in that XXX folder also) in Notepad and change the "SLUS_whatever" part to BOOT.09. So instead of cdrom0: \SLUS_210.73 as example, change the SLUS_210.73 to BOOT.09 THIS IS IMPORTANT OR IT WONT BOOT ULAUNCHER AT ALL.
6. After all that, Open CD/DVD Rom Generator (Select new project then select DVD Master if ISO u extracted is bigger than 750MB. Select CD Master if the game/ISO isn't. Example. Star Wars Racer Revenge would be a CD. Not a DVD, cuz it's less than 750MB in size). THEN select ALL the files I mentioned above (should all be in same folder with the extracted ISO files and after they were modified. Again, XXX folder is used) and drag everything from that XXX folder to the biggest box in that program (CD/DVD Rom Generator) on the right...
This method is literally almost identical to that of the PS3. Only difference is the fact that we are building a PKG file as an extra step. Process is the same if u wanna put Codebreaker cheats in ur PS2 games on a Jailbroken PS3 (again, excluding the PKG building part).
So here is a text tutorial for those that want it. I'll also post a video that lots of you probably already have seen, but just in case you haven't. THIS NEVER HAS WORKED FOR ME WITH THE PS2 CLASSICS GUI, SO MY ADVICE IS DON'T USE THAT. ONLY USE THE ORBIS PKG BUILDING PROGRAMS. Here it is (video at bottom):
Steps (all programs are free and given towards bottom of post in a link):
1. Extract ISO with ISOBuster (free) to a folder (let's say it's called XXX)
2. Rename wLaunchelf.ELF file to BOOT.09
3. Keep CodeBreaker.ELF named the same and don't touch it.
4. Drag the wLaunchelf.ELF that u renamed to BOOT.09 AND Codebreaker.ELF into the same folder as all the other files that was extracted from ISO (XXX folder is used)
Note: If using a PAL game, the original Codebreaker.ELF might not work, so use the 1 I provided in download link below that NOW contains "Xploder.ELF" as well that will work with PAL games. Folders are labeled in download for your convenience
5. Open the SYSTEM.CNF file (that was extracted from ISO in that XXX folder also) in Notepad and change the "SLUS_whatever" part to BOOT.09. So instead of cdrom0: \SLUS_210.73 as example, change the SLUS_210.73 to BOOT.09 THIS IS IMPORTANT OR IT WONT BOOT ULAUNCHER AT ALL.
6. After all that, Open CD/DVD Rom Generator (Select new project then select DVD Master if ISO u extracted is bigger than 750MB. Select CD Master if the game/ISO isn't. Example. Star Wars Racer Revenge would be a CD. Not a DVD, cuz it's less than 750MB in size). THEN select ALL the files I mentioned above (should all be in same folder with the extracted ISO files and after they were modified. Again, XXX folder is used) and drag everything from that XXX folder to the biggest box in that program (CD/DVD Rom Generator) on the right...
ESP8266 Server From SD Card for PS4 4.55 Payloads by Stooged
I managed to get some time to goto my local Jaycar store and pickup some ESP8266 boards and some SD breakout boards.
I have put together a small example of a webserver with the files hosted off a SD card. Using an SD card allows you to update the payloads without needing to flash the ESP board and it allows you to have more than around 4MB of files because the ESP boards have a low amount of storage memory. It also has a DNS server built in so you can use it via the user guide on the PS4.
You can also configure the webserver and wifi access point from a file on the SD card with CONFIG.INI.
The Arduino SD library is limited to 8:3 file name format which means all the file names must be 8 characters or less and the file extension must be 3 characters or less, this would be the limit FILENAME.TXT
 Make sure you use a SD card that is formatted to fat or fat32.
On my board (d1 mini compatible) the following pins are used with the SD breakout board
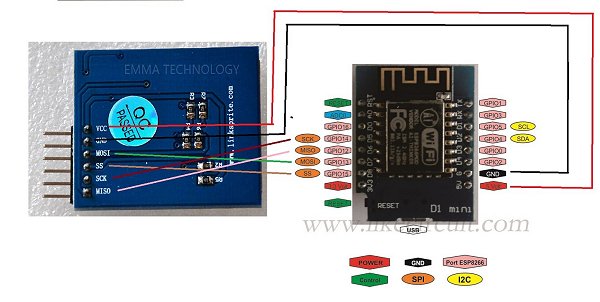
You can find datasheets online for all the different types of boards so you should be able to find the pins you need to connect to.
The ino sketch and SD files are here: https://github.com/stooged/ESP-Server
@pearlxcore has a guide here on how to program the ESP8266 board using the Arduino ide.
I might look at opening up one of my PS4s and installing it inside the PS4 and soldering it in because it is pretty small.
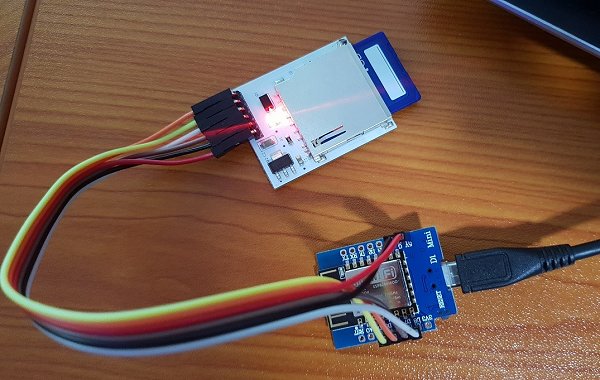
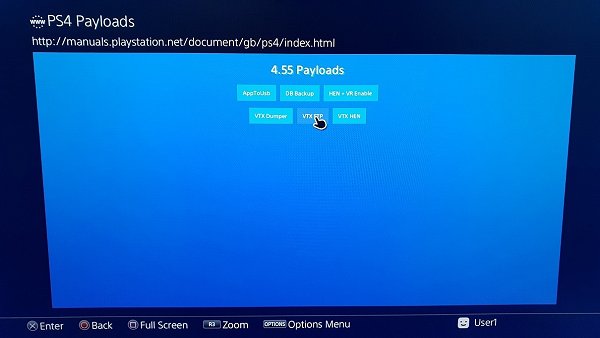
I have put together a small example of a webserver with the files hosted off a SD card. Using an SD card allows you to update the payloads without needing to flash the ESP board and it allows you to have more than around 4MB of files because the ESP boards have a low amount of storage memory. It also has a DNS server built in so you can use it via the user guide on the PS4.
You can also configure the webserver and wifi access point from a file on the SD card with CONFIG.INI.
The Arduino SD library is limited to 8:3 file name format which means all the file names must be 8 characters or less and the file extension must be 3 characters or less, this would be the limit FILENAME.TXT
Make sure you use a SD card that is formatted to fat or fat32.On my board (d1 mini compatible) the following pins are used with the SD breakout board
- D5 = SCK
- D6 = MISO
- D7 = MOSI
- D8 = SS
You can find datasheets online for all the different types of boards so you should be able to find the pins you need to connect to.
The ino sketch and SD files are here: https://github.com/stooged/ESP-Server
@pearlxcore has a guide here on how to program the ESP8266 board using the Arduino ide.
I might look at opening up one of my PS4s and installing it inside the PS4 and soldering it in because it is pretty small.
Adding Your Choice of Payloads Into PS4 Playground for ESP8266
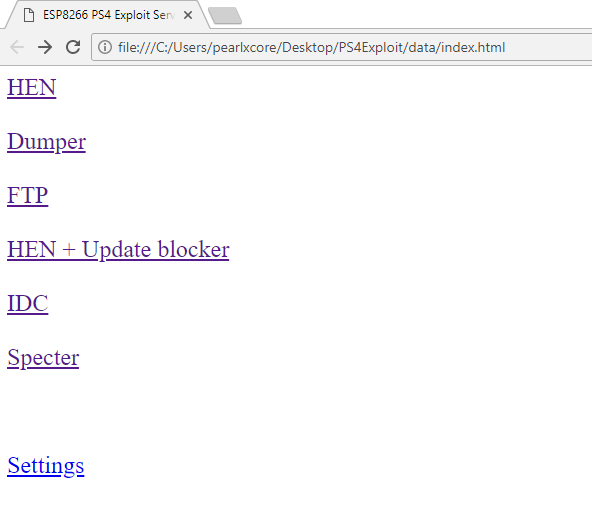
Following my previous guide, here is another tutorial as requested covering how to add your choice of payload into PS4 playground for ESP8266.
Again I use treyjazz's sample webpage for this tutorial (in 'data' folder inside PS4Exploit).
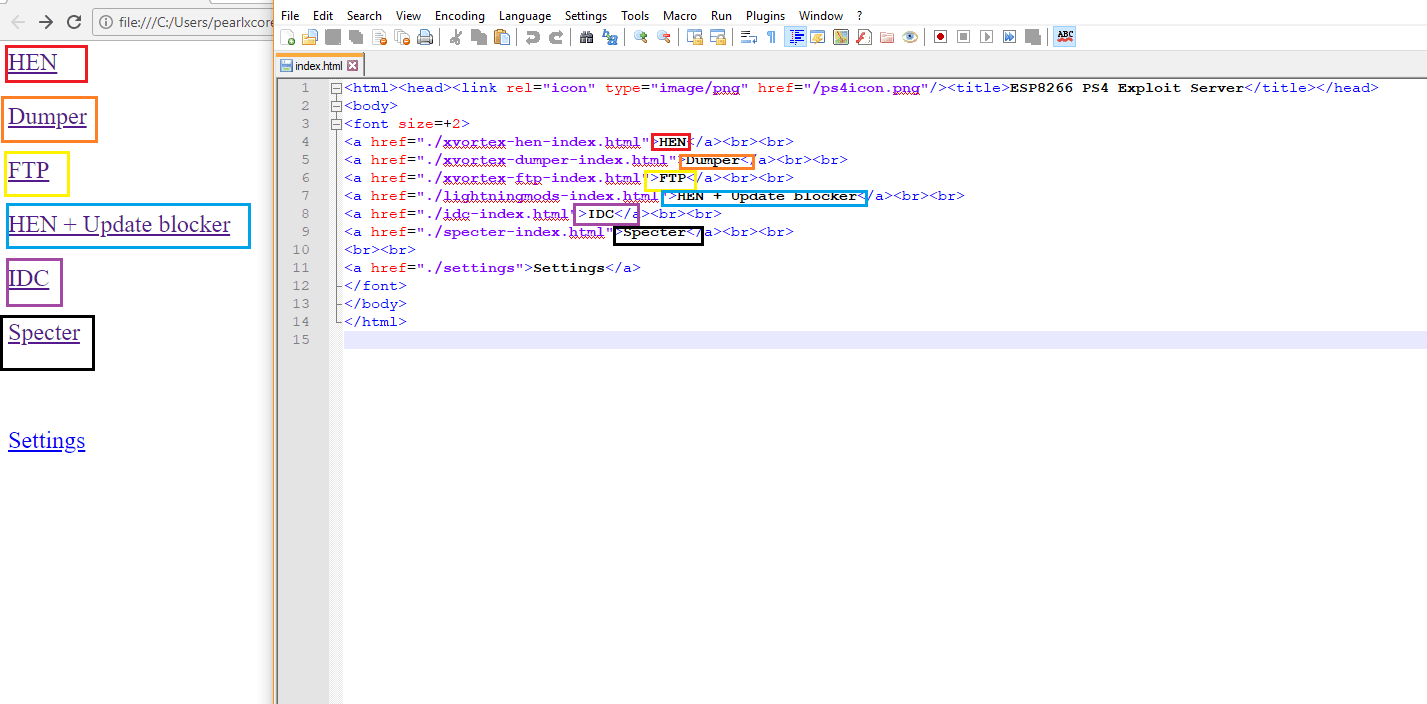
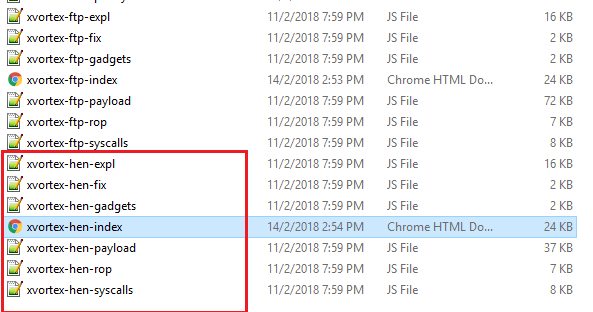
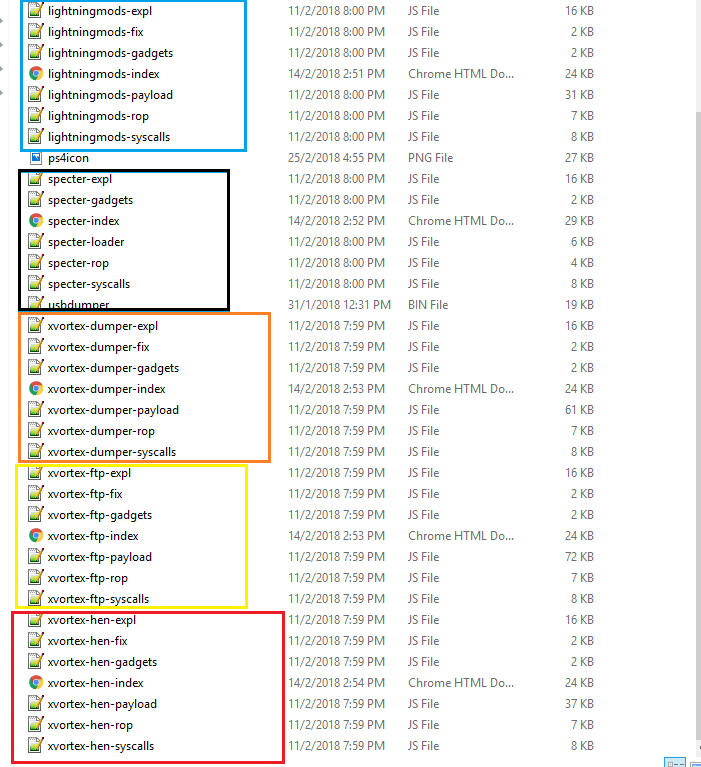
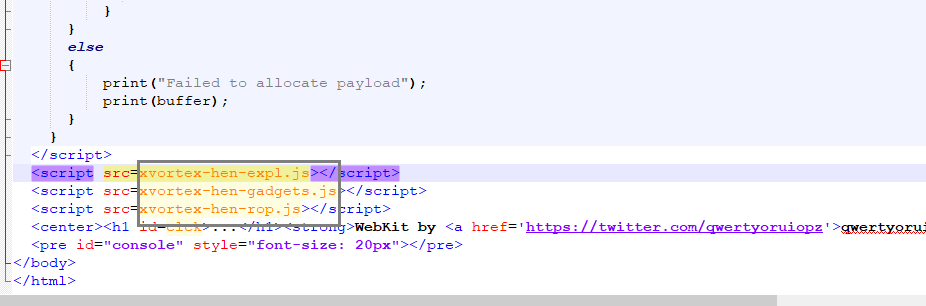
So how you add the payload of your choice?
Again I use treyjazz's sample webpage for this tutorial (in 'data' folder inside PS4Exploit).
- I suggest you download Notepad++ for code editing. Download and install.
- So now navigate to 'data' folder. You will see bunch of files (.js and .html) in it. The webpage you see on ESP8266 is coded in 'index.html'. So find 'index.html', right-click on it, click 'Edit with Notepad++'.
- Now double-click on 'index.html' and the page will open on your browser.
- Now compare side by side the code and the webpage
- You can now understand a bit the how its relate. In the code, those I highlighted in colour is the text showed in webpage. Each payload option has different index source. For example HEN is pointed to 'xvortex-hen-index.html'. So now find 'xvortex-hen-index.html' in the folder.
- You will see files with same name 'xvortex-hen-'. Those are the HEN exploit files required to exploit your PS4. And you see files with other name too
- The different name separate the exploit files so its not mix up.
- Ok back to our example, HEN exploit. Right-click on 'xvortex-hen-index.html' and scroll down to bottom.
- You can see some .js file mention in the code. It means the webpage calling the .js file during the execution of exploit. Each of payload type have it files to excute.
Code:
index.html
|
| (When you selected HEN)
|
xvortex-hen-index.html
|
|        (calling)
|
|-------------------------------
|xvortex-hen-expl.js           |
|xvortex-hen-gadgets.js        |
|xvortex-hen-rop.js            |
|xvortex-hen-payload.js        |
--------------------------------
|
|
HEN exploit done- 1st prepare...
- PS4 Fake PKG (FPKG) Sharing Guide
- 6.XX Webkit / 6.72 PS4 Jailbreak
- 7.00-7.02 Webkit Exploit
- 7.02 Webkit / 7.02 Kernel / PS4JB
- 7.50 Kernel Exploit / PS4JB 7.55
- 7.55 / 8.00 Payloads / PS4JB2 7.55
- 9.00 PS4 Webkit Exploit
- 9.00 PS4 Payloads / GoldHEN (Latest)
- 9.00 PS4 Jailbreak Kernel Exploit
- 11.00 PS4 Jailbreak Kernel Exploit
- 13.00 PS4 Kernel Exploit / 13.02 BD-J Bug
- 4.03 PS5 Webkit Exploit
- PS5 Kernel Exploit (ExFAT Bug)
- PS5 Root Keys Obtained
- 4.03 PS5 Kernel Build String
- 4.03 PS5 Webkit Execution
- 4.03 PS5 Kernel Vulnerability
- 4.03 PS5 Filesystem Dumps
- 4.51 PS5 BD-JB Sandbox Escape
- PS5 BD-JB Exploit Hack Source Code
- Mast1c0re PS5 Userland Exploit
- PS5 Kernel Access via PS4 Exploit
- PS5 exFAT Vulnerability Disclosed
- 4.03 PS5 Kernel Exploit Webkit ROP
- 4.50 PS5 Kernel Exploit Webkit ROP
- 4.51 PS5 Kernel Exploit Webkit ROP
- 4.xx PS5 Kernel Exploit v1.01
- 4.xx PS5 Kernel Exploit v1.02 / v1.03
- PS5 1.00-6.50 Firmware Webkit
- Native PS5 ROP Chain Execution
- Mast1c0re PS5 Compiler Attack
- PS5 FreeBSD Kernel Bug & WebKit
- PS5 UMTX 2 Exploit & PS5 Jailbreak
- Byepervisor PS5 Hypervisor Exploit
- Lua Lapse PS5 Kxploit & Laps3c0re / Y2JB
- 12.00 / 12.70 PS5 Kernel Exploit