PSXHAX.COM website and domain for sale. Contact Us with your offer!

You are using an out of date browser. It may not display this or other websites correctly.
You should upgrade or use an alternative browser.
You should upgrade or use an alternative browser.
PS4 Remote Play PSN Sign-in Bypass Guide by Yifan Lu
Last week reported on a PS Vita Netcheck Bypass, and today PlayStation 4 developer Yifan Lu shared a PS4 Remote Play PSN sign-in bypass guide for use with their taiHENkaku HENkaku taiHEN CFW framework. 
To quote from Yifan Lu on his tutorial: PS4 Remote Play Without PSN Sign-in
Remote Play requires a PSN sign-in at some point because when you sign-in to PSN, your online ID gets cached (along with your avatar image URL and banner image URL). The online id is required to link (make sure the same PSN account/online ID is used on both your Vita and PS4).
If you logged in to PSN in the past (before PSN spoofing was disabled by Sony), then this cached info is already on your Vita. However, if you formatted your Vita after PSN spoofing was disabled OR you purchased your Vita after spoofing was disabled, then you need to manually create this cache file. This guide will lead you through in doing that.
Creating the Online ID Cache
To quote from Yifan Lu on his tutorial: PS4 Remote Play Without PSN Sign-in
Remote Play requires a PSN sign-in at some point because when you sign-in to PSN, your online ID gets cached (along with your avatar image URL and banner image URL). The online id is required to link (make sure the same PSN account/online ID is used on both your Vita and PS4).
If you logged in to PSN in the past (before PSN spoofing was disabled by Sony), then this cached info is already on your Vita. However, if you formatted your Vita after PSN spoofing was disabled OR you purchased your Vita after spoofing was disabled, then you need to manually create this cache file. This guide will lead you through in doing that.
Creating the Online ID Cache
- Make sure your Vita is linked to your PSN account. You do not have to be activated! To ensure you are linked, restore your Vita (do NOT format your memory card unless you want to lose everything). Once you get to the welcome screen, select that you already have a PSN account and type in the information. If you remember doing this when you last went through the setup, you do not have to do it again.
- Download and open up a hex editor. Create a new file and fill it with 328 bytes of 00. To help, you can copy the following:
Code:
00 00 00 00 00 00 00 00 00 00 00 00 00 00 00 00 00 00 00 00 00 00 00 00 00 00 00 00 00 00 00 00 00 00 00 00 00 00 00 00 00 00 00 00 00 00 00 00 00 00 00 00 00 00 00 00 00 00 00 00 00 00 00 00 00 00 00 00 00 00 00 00 00 00 00 00 00 00 00 00 00 00 00 00 00 00 00 00 00 00 00 00 00 00 00 00 00 00 00 00 00 00 00 00 00 00 00 00 00 00 00 00 00 00 00 00 00 00 00 00 00 00 00 00 00 00 00 00 00 00 00 00 00 00 00 00 00 00 00 00 00 00 00 00 00 00 00 00 00 00 00 00 00 00 00 00 00 00 00 00 00 00 00 00 00 00 00 00 00 00 00 00 00 00 00 00 00 00 00 00 00 00 00 00 00 00 00 00 00 00 00 00 00 00 00 00 00 00 00 00 00 00 00 00 00 00 00 00 00 00 00 00 00 00 00...
Setting Up & Building Payload.bin for PS4 Playground Guide by KKE_RW
We've seen a number of PlayStation 4 payloads including the PS4 Permanent Internet Browser Payload and a PS4 FTP Payload, and today PlayStation 4 developer KKE_RW shared a guide on Setting Up and Building Payload.bin for PS4 Playground as detailed below. 
To quote: Tutorial: How To Setup And Build Payload.bin For PS4 Using PlayGround
Hope it helps and Thanks to me KKE_RW, Cturt and 2much4u
To quote: Tutorial: How To Setup And Build Payload.bin For PS4 Using PlayGround
Hope it helps and Thanks to me KKE_RW, Cturt and 2much4u
- KKE_RW For This Tutorial
- 2much4u For Helping Me Help You
- CTurt For His PS4-*** And Webkit
- kR105, flatz, SKFU, droogie, Xerpi, Hunger, Takezo, nas, Proxima
- VirtualBox
- Ubunto
- LLVM
- Binutils
- PS4-***
- Install VirtualBox
- When Installed Open Up Click New
- Type: Linux
- Version: 64bit
- Recommended Memory (768MB - 4000MB) # Up To You
- Create a Virtual Hard Disk
- VDI (VirtualBox Disk Image)
- Dynamically allocated
- Hit next then create...
- Right Click Open Settings/Storage
- Controller: IDE #there a Disk+ At side click on that.
- Choose Disk
- Find File Location Of Ubuntu #ISO FILE
- File Name "ubuntu-16.04.1-desktop-amd64"
- Now Click Start.. #you might get error i686 Easy Fix.
- How To Fix At The Bottom Of This Thread.
- Now You Will Need To Setup #Its Easy
- Ok So start it up And install it like windows...
- Make Sure Your Doing This On Ubuntu And Not On Your Window
- Search Your Computer #Top Left
- Find Terminal And Open It Type Command
- " sudo apt install llvm " Hit Enter
- When Done
- Type Command
- " sudo apt install binutils " Hit Enter
- When Done. Close.
Setting Up a USB 3.0 External HDD on PS4 Firmware 4.50 Guide
We've covered Upgrading a PS4 HDD, and beyond some Sasuke Crashes with the release of PS4 Firmware 4.50 Beta comes a guide on setting up a USB 3.0 external hard disk drive up to 8 Terabytes (TB) on PlayStation 4 Firmware 4.50 and above. 
Here are the PS4 External HDD Set Up Tutorial steps, to quote from the gurus at JustPushStart.com:
How To Use your External Hard Drive
To be able to use your external hard drive, make sure that the one you have is utilizes USB 3.0. You can either use the 3.5 External Hard Drive or those portable ones. In my case, I used Nyko’s Databank of the Xbox One to be the external hard drive of my PS4, equipped with an additional 1TB WD Green 3.5 hard drive.
Formatting your external hard drive is quite easy. Simply go to Settings and go to Devices. Under it, you’ll find USB Storage Devices.
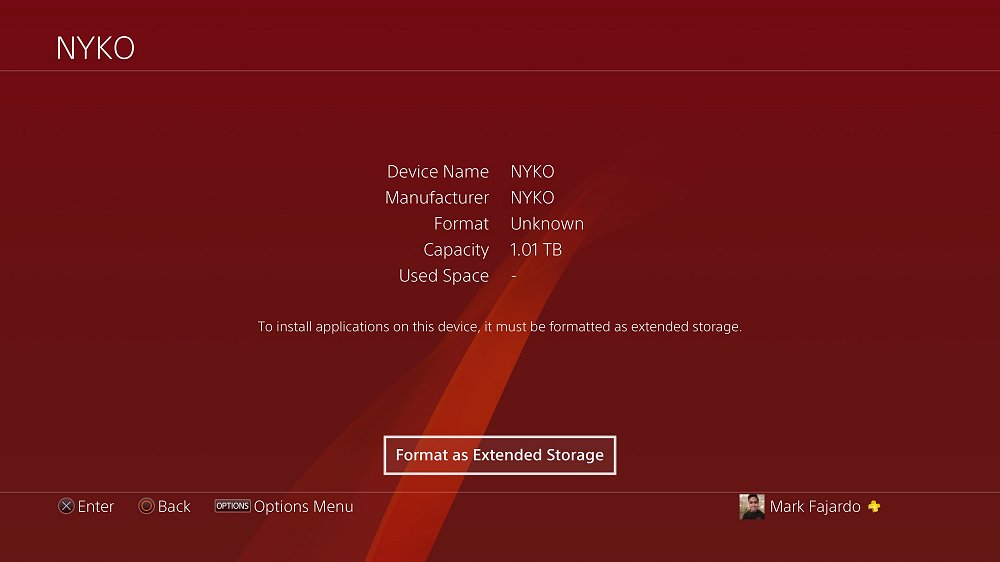
If you have multiple external hard drives hooked up on your PS4, find the ones you want to use. You’ll be then asked to format it.
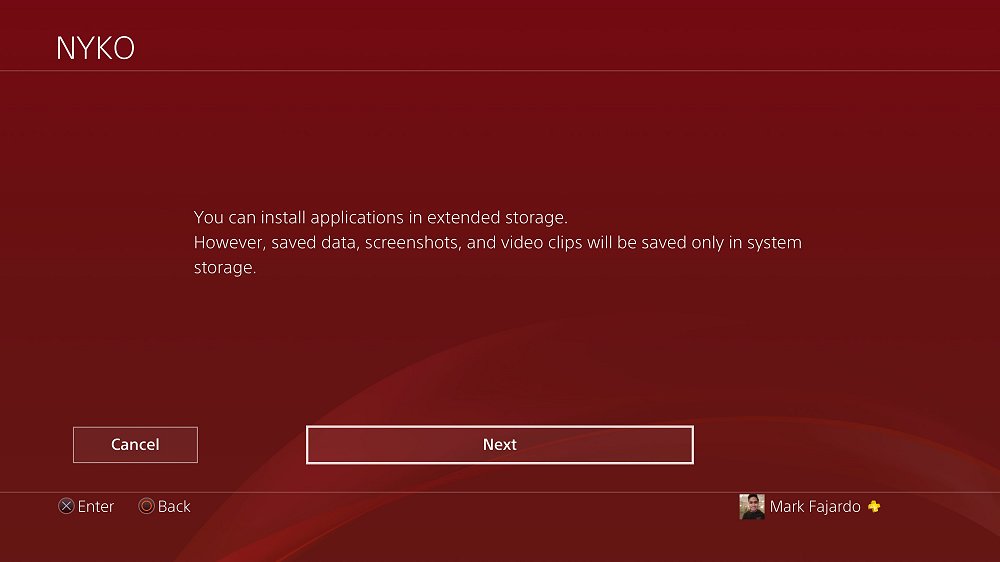
You’ll then go through the set-up process which is pretty quick.
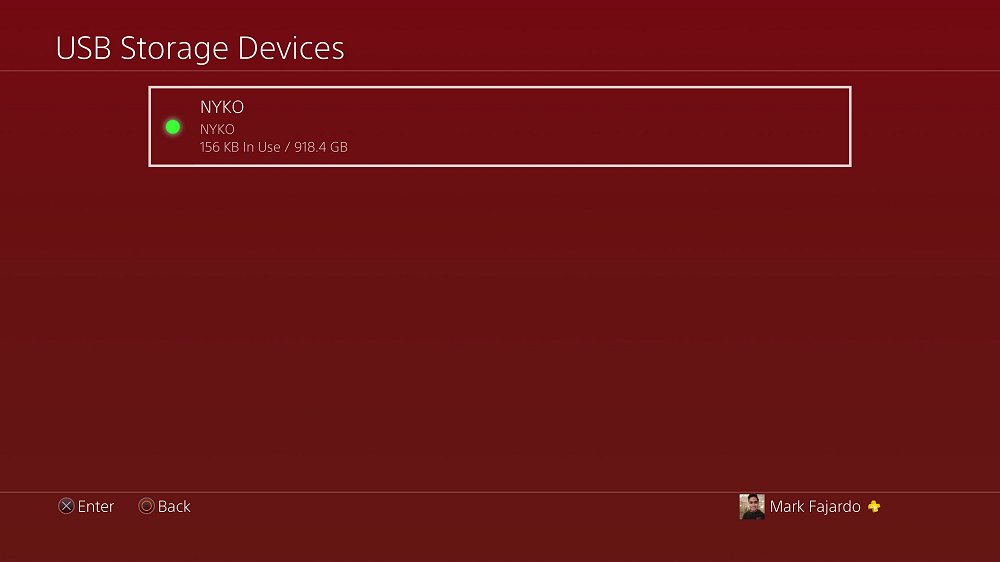
Once it’s done formatting, go back to the USB Storage Devices and you should see a green light icon beside the ones you formatted. If so, you are ready to use the hard drive!
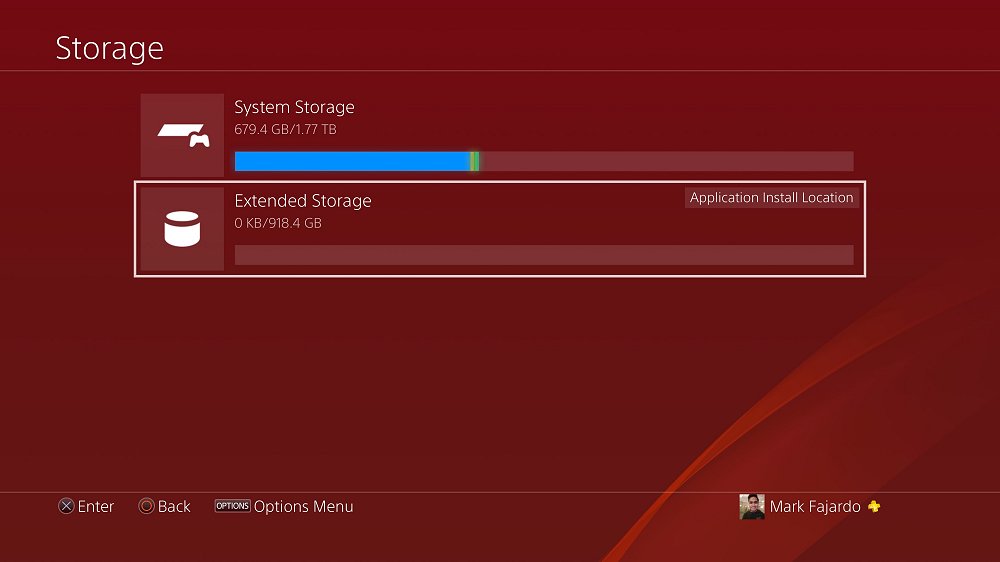
Now, you have the option to either use the hard drive you just formatted or simply keep installing applications on your internal storage until its full. To change the Applications Install location, simply highlight the hard drive of your choice, click the Options button from your DUALSHOCK 4 controller, and click confirm. You should see a text “Application Install Location” on the hard drive of your choice.
Please note that ONLY the applications and games are installed on the External Hard Drive. Save Datas and other internal files will be installed on the internal storage of your PS4.
Finally, from TheReverend210...
Here are the PS4 External HDD Set Up Tutorial steps, to quote from the gurus at JustPushStart.com:
How To Use your External Hard Drive
To be able to use your external hard drive, make sure that the one you have is utilizes USB 3.0. You can either use the 3.5 External Hard Drive or those portable ones. In my case, I used Nyko’s Databank of the Xbox One to be the external hard drive of my PS4, equipped with an additional 1TB WD Green 3.5 hard drive.
Formatting your external hard drive is quite easy. Simply go to Settings and go to Devices. Under it, you’ll find USB Storage Devices.
If you have multiple external hard drives hooked up on your PS4, find the ones you want to use. You’ll be then asked to format it.
You’ll then go through the set-up process which is pretty quick.
Once it’s done formatting, go back to the USB Storage Devices and you should see a green light icon beside the ones you formatted. If so, you are ready to use the hard drive!
Now, you have the option to either use the hard drive you just formatted or simply keep installing applications on your internal storage until its full. To change the Applications Install location, simply highlight the hard drive of your choice, click the Options button from your DUALSHOCK 4 controller, and click confirm. You should see a text “Application Install Location” on the hard drive of your choice.
Please note that ONLY the applications and games are installed on the External Hard Drive. Save Datas and other internal files will be installed on the internal storage of your PS4.
Finally, from TheReverend210...
PlayStation VR on PC with PSVRFramework / PSVRToolbox Guide
Following the LibPSVR PSVR C Library, PlayStation 4 developer gusmanb has been working on PSVRFramework alongside PSVRToolbox... and with them zachhouseknecht put together a PlayStation VR on PC Guide for those interested! 
Download: PSVRToolboxPortable.zip (v0.4.6) / GIT
To quote: First off I would like to thank gusmanb & DerTooSoon for such a great start on not only the PSVRHack subreddit but also working on making a solution for PS VR to work (somewhat easily) with the PC.
The only problem I was continually having was finding one place with step by step installation. I understand this is hard as people's setups may vary. But I found shortly after I downloaded what I needed and read one of DerToosoon's comments I figured out the process pretty easily.
First and foremost you will need your PS VR headset and the breakout box (obviously). Setup the breakout box how you normally would - except you are taking the HDMI that would regularly go into the PS4 and plugging that into your PC's HDMI out.
Step 1. Plug the breakout box USB into your Windows PC. Windows will attempt (and fail) to find drivers for most of the breakout box functionality aside from an audio driver.
Step 2. Download (if you haven't already) both PS VR Framework as well as libusb-win32. You need both of these to properly interface (easily) with the PS VR headset. I'm going to get you set up - what you do after is of your own accord.
Step 3A. Run libusb's "install-filter-win" that is appropriate for your system - there are options for amd64, ia64, and x86. Select "Install a Device Filter". You will be selecting "vid:054c pid:09af rev:0107 mi:05" USB Input Device" and then hitting install. Make sure you select that device - there are numerous devices titled similarly - don't make the same mistake I did the first time!
Step 3B. Make sure both "libusb0.dll" and "libusb0.sys" are in your...
Download: PSVRToolboxPortable.zip (v0.4.6) / GIT
To quote: First off I would like to thank gusmanb & DerTooSoon for such a great start on not only the PSVRHack subreddit but also working on making a solution for PS VR to work (somewhat easily) with the PC.
The only problem I was continually having was finding one place with step by step installation. I understand this is hard as people's setups may vary. But I found shortly after I downloaded what I needed and read one of DerToosoon's comments I figured out the process pretty easily.
First and foremost you will need your PS VR headset and the breakout box (obviously). Setup the breakout box how you normally would - except you are taking the HDMI that would regularly go into the PS4 and plugging that into your PC's HDMI out.
Step 1. Plug the breakout box USB into your Windows PC. Windows will attempt (and fail) to find drivers for most of the breakout box functionality aside from an audio driver.
Step 2. Download (if you haven't already) both PS VR Framework as well as libusb-win32. You need both of these to properly interface (easily) with the PS VR headset. I'm going to get you set up - what you do after is of your own accord.
Step 3A. Run libusb's "install-filter-win" that is appropriate for your system - there are options for amd64, ia64, and x86. Select "Install a Device Filter". You will be selecting "vid:054c pid:09af rev:0107 mi:05" USB Input Device" and then hitting install. Make sure you select that device - there are numerous devices titled similarly - don't make the same mistake I did the first time!
Step 3B. Make sure both "libusb0.dll" and "libusb0.sys" are in your...
Resigning PS4 Trophies from Retail to Debug Guide by Zecoxao
After the snazzy PS4 Retail / Debug Game Transfusion Tutorial and PlayStation 4 Trophy Resigner Script over the weekend, developer @zecoxao has been nice enough to share a guide on resigning PS4 Trophies from Retail to Debug with the help of Charles and @happyelement (harlequin) today!
Here is it from zecoxao: How to Resign Trophies from Retail to Debug Tutorial
So, for this tutorial, none of this would've been possible without the help of harlequin and Charles. All of the credits go to them, thanks guys
You will need:
1- Extract the contents of the trophy keys zipfile into your %USERPROFILE% folder (in my case it's C:\Users\zecoxao). You will have it as C:\Users\zecoxao\ps4keys\<keys_here>
2- Navigate to:
And find the TITLE ID of the game which you want to resign the trophy file
3- Copy the CUSA title id folder to a safe place.
4- Open npbind.dat inside with Hexeditor:
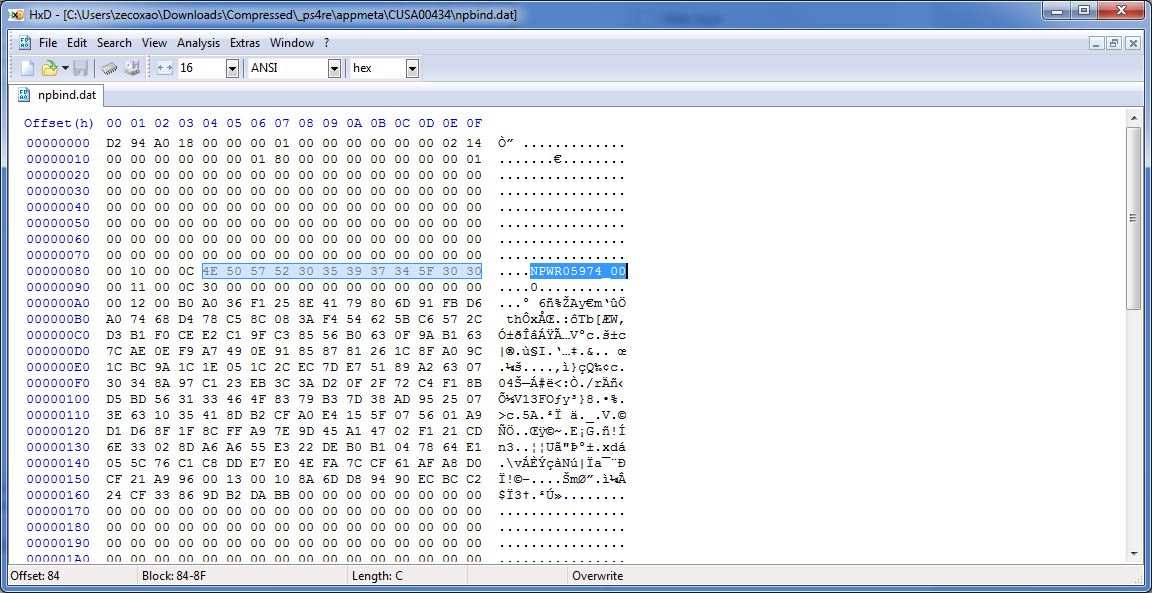
Here we can see that game CUSA00434 has correspondant trophy file NPWR05974
5- Now that you know correspondant id, navigate to:
and find folder with that id and place it somewhere safe on your pc. you know have two things: your np...
Here is it from zecoxao: How to Resign Trophies from Retail to Debug Tutorial
So, for this tutorial, none of this would've been possible without the help of harlequin and Charles. All of the credits go to them, thanks guys
You will need:
- A PS4 on 1.76 Firmware with FTP (payload) capabilities
- The PS4 trophy keys: ps4keys.zip
- Trophy Resigner: trp_resigner.zip
- The TITLE ID of the game whose trophies you want to resign
- An HexEditor
- Command line Knowledge
1- Extract the contents of the trophy keys zipfile into your %USERPROFILE% folder (in my case it's C:\Users\zecoxao). You will have it as C:\Users\zecoxao\ps4keys\<keys_here>
2- Navigate to:
Code:
/system_data/priv/appmeta3- Copy the CUSA title id folder to a safe place.
4- Open npbind.dat inside with Hexeditor:
Here we can see that game CUSA00434 has correspondant trophy file NPWR05974
5- Now that you know correspondant id, navigate to:
Code:
/user/trophy/conf- PS4 Fake PKG (FPKG) Sharing Guide
- 6.XX Webkit / 6.72 PS4 Jailbreak
- 7.00-7.02 Webkit Exploit
- 7.02 Webkit / 7.02 Kernel / PS4JB
- 7.50 Kernel Exploit / PS4JB 7.55
- 7.55 / 8.00 Payloads / PS4JB2 7.55
- 9.00 PS4 Webkit Exploit
- 9.00 PS4 Payloads / GoldHEN (Latest)
- 9.00 PS4 Jailbreak Kernel Exploit
- 11.00 PS4 Jailbreak Kernel Exploit
- 13.00 PS4 Kernel Exploit / 13.02 BD-J Bug
- 4.03 PS5 Webkit Exploit
- PS5 Kernel Exploit (ExFAT Bug)
- PS5 Root Keys Obtained
- 4.03 PS5 Kernel Build String
- 4.03 PS5 Webkit Execution
- 4.03 PS5 Kernel Vulnerability
- 4.03 PS5 Filesystem Dumps
- 4.51 PS5 BD-JB Sandbox Escape
- PS5 BD-JB Exploit Hack Source Code
- Mast1c0re PS5 Userland Exploit
- PS5 Kernel Access via PS4 Exploit
- PS5 exFAT Vulnerability Disclosed
- 4.03 PS5 Kernel Exploit Webkit ROP
- 4.50 PS5 Kernel Exploit Webkit ROP
- 4.51 PS5 Kernel Exploit Webkit ROP
- 4.xx PS5 Kernel Exploit v1.01
- 4.xx PS5 Kernel Exploit v1.02 / v1.03
- PS5 1.00-6.50 Firmware Webkit
- Native PS5 ROP Chain Execution
- Mast1c0re PS5 Compiler Attack
- PS5 FreeBSD Kernel Bug & WebKit
- PS5 UMTX 2 Exploit & PS5 Jailbreak
- Byepervisor PS5 Hypervisor Exploit
- Lua Lapse PS5 Kxploit & Laps3c0re / Y2JB
- 12.00 / 12.70 PS5 Kernel Exploit