PSXHAX.COM website and domain for sale. Contact Us with your offer!

You are using an out of date browser. It may not display this or other websites correctly.
You should upgrade or use an alternative browser.
You should upgrade or use an alternative browser.
PSXHAX - PSXHACKS: PSX HAX - PSX HACKS - PLAYSTATION HAX - PLAYSTATION HACKS
BladeMenu: PS3 / PC Toggle Windows Static IP / DNS Script by Blade
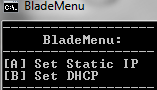
Following my Splinter Cell: Blacklist PS3 OFW BD Mirror FIX Guide I have another thing to share... I wrote a little Windows script called BladeMenu which is a simple batch script to toggle between "preconfigured Static IP & DNS" and "Dynamically" followed by Version 2 linked below.
Download: Blade_PS3_Menu_clean.rar / Blade_PS3_Menu_admin.rar / BladeMenu Version 2
Purpose: With this settings and a direct LAN connection between PC & PS3, you can get full speed with FTP-transfer. There is a small brainfart goin on up there, because I'm getting speeds over 15MB/s and to my knowledge the PS3's ethernetport is a 100MBit port resulting in a 12,5MB/s transfer rate, but hey better too fast than too slow
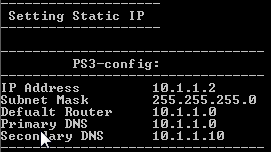
Never the less: its a hassle to switch between those settings every time - manually. Thats why I wrote the script including instructions for PS3 incase one forgets ^^:
Version 2
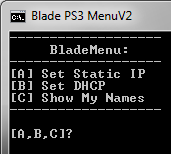
There are two versions of my script:
1) Clean one: Need to be run as admin (i.e. with a shortcut)
2) Admin: Ask for admin itself (the first 20 lines of code are NOT mine, they ask for admin)
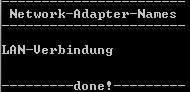
You need to modify the name to YOUR connection name:
Clean-Script: line 3
Admin-Script: line 23
Download: Blade_PS3_Menu_clean.rar / Blade_PS3_Menu_admin.rar / BladeMenu Version 2
Purpose: With this settings and a direct LAN connection between PC & PS3, you can get full speed with FTP-transfer. There is a small brainfart goin on up there, because I'm getting speeds over 15MB/s and to my knowledge the PS3's ethernetport is a 100MBit port resulting in a 12,5MB/s transfer rate, but hey better too fast than too slow
Never the less: its a hassle to switch between those settings every time - manually. Thats why I wrote the script including instructions for PS3 incase one forgets ^^:
Version 2
There are two versions of my script:
1) Clean one: Need to be run as admin (i.e. with a shortcut)
2) Admin: Ask for admin itself (the first 20 lines of code are NOT mine, they ask for admin)
You need to modify the name to YOUR connection name:
Clean-Script: line 3
Admin-Script: line 23
Code:
SET lanname=LAN-Verbindung
Splinter Cell: Blacklist PS3 OFW BD Mirror FIX Tutorial by Blade
Here is my PS3 OFW BD Mirror FIX tutorial for Splinter Cell: Blacklist, geared towards those who already tried checking the downgradable PS3 models and PS3 CFW FAQ with no luck, and decided to try one of the more recent PS3 Data Transfer Utility (DTU) / Backup Injection / Conversion methods.
Error-output with usual method:
How to fix? On CFW, just enable BD-mirror or use cobra, but what about OFW??
Requirements:
Your game will fill up the DOUBLE amount of memory on hdd
Notes:
For getting game-updates, use ps3tools' gameupdater. To get the right GAMEID you can check the PARAM.SFO of your game with ps3tools' SFO-Editor: i.e. BLES01878, BLUS31025, BLES01766
I'm gonna take BLES01766 for this tut...
STEPs:
Error-output with usual method:
Code:
LocID_CONF_Disc_Read_ErrorRequirements:
- The untouched game (i.e.: BLES01766-[Splinter.Cell-Blacklist])
- The official game-update (i.e.: EP0001-BLES01766_00-BLEFIGSNLSCNPOBR-A0103-V0100-PE_fw43000.00.pkg)
- PS3GameConvert_v0.9.exe / PS3GameConvert_v0.91.rar
Your game will fill up the DOUBLE amount of memory on hdd
Notes:
For getting game-updates, use ps3tools' gameupdater. To get the right GAMEID you can check the PARAM.SFO of your game with ps3tools' SFO-Editor: i.e. BLES01878, BLUS31025, BLES01766
I'm gonna take BLES01766 for this tut...
STEPs:
- Do the usual Method and convert the original game with PS3GameConvert_v0.9.exe by using the proper game-update corresponding to your GAMEID EP0001-BLES01766_00-BLEFIGSNLSCNPOBR-A0103-V0100-PE_fw43000.00.pkg
Output is:
- Open the original game-folder: i.e. BLES01766-[Splinter.Cell-Blacklist]\PS3_GAME\USRDIR
- Now mark the following to copy...
PlayBook 4 S & PlayBook 4 Pro - PS4 Slim Laptop Mods Demo Video
PlayStation 4 console case modder Eddie Zarick (YouTube Channel) of Ed's Junk recently shared a demonstration video of his latest creation, a 19" laptop with a built in PS4 Slim (dubbed PlayBook 4 S, with pictures of a 24" PlayBook 4 Pro also below) for portable gaming on the go complete with HDMI output! 
If anyone out there with deep pockets is interested, the PlayBook 4 System goes for $1,495.00 plus $150 shipping to the 48 US States or $1,195.00 if you supply the PS4 Slim console to be modded.
Below is his latest PlayBook 4 S New Slim PS4 Laptop demo video, and from PlayBook4.com, to quote:
"Once you open up the PlayBook 4 S you will be surprised at how big the 19″ screen actually is for the size of the system. I tried my best to keep as small as a bezel as I could around the LCD without compromising the integrity of the case.
The screen sits at a good height while the hinges provide enough tension to be able to adjust the angle of the screen as you wish. Below you will notice a couple of stereo speakers and TV control along with the Blu-ray drive, 2 USB and a power and eject button.
The speakers provide loud crisp audio, while the small black TV controller button allows you to adjust the volume along with other TV settings, like brightness and contrast. The screen is HD, but only supports 720p. Unfortunately it is next to impossible to find 1080p screens in the 19″ size. But, the HDMI in the back will support full 1080p output to your external Big screen at home!
On the back of the system you will notice more air vents to keep the PS4 nice and cool. On either side of the vents you have a ethernet port for wired internet access (and yes, Wi-Fi still works just fine!) and then power and HDMI out.
The HDMI out is great for still being able to use the PS4 on your large screen when your at home. Please note, when using it at home, you can turn off the LCD and still get HDMI out, also you must keep the screen open for the PS4 to keep cool.
So can you get one of these PlayBooks? Of COURSE! I build these to order and you can have your own custom PS4 that you can not get in the...
If anyone out there with deep pockets is interested, the PlayBook 4 System goes for $1,495.00 plus $150 shipping to the 48 US States or $1,195.00 if you supply the PS4 Slim console to be modded.
Below is his latest PlayBook 4 S New Slim PS4 Laptop demo video, and from PlayBook4.com, to quote:
"Once you open up the PlayBook 4 S you will be surprised at how big the 19″ screen actually is for the size of the system. I tried my best to keep as small as a bezel as I could around the LCD without compromising the integrity of the case.
The screen sits at a good height while the hinges provide enough tension to be able to adjust the angle of the screen as you wish. Below you will notice a couple of stereo speakers and TV control along with the Blu-ray drive, 2 USB and a power and eject button.
The speakers provide loud crisp audio, while the small black TV controller button allows you to adjust the volume along with other TV settings, like brightness and contrast. The screen is HD, but only supports 720p. Unfortunately it is next to impossible to find 1080p screens in the 19″ size. But, the HDMI in the back will support full 1080p output to your external Big screen at home!
On the back of the system you will notice more air vents to keep the PS4 nice and cool. On either side of the vents you have a ethernet port for wired internet access (and yes, Wi-Fi still works just fine!) and then power and HDMI out.
The HDMI out is great for still being able to use the PS4 on your large screen when your at home. Please note, when using it at home, you can turn off the LCD and still get HDMI out, also you must keep the screen open for the PS4 to keep cool.
So can you get one of these PlayBooks? Of COURSE! I build these to order and you can have your own custom PS4 that you can not get in the...
Guide to Enable More Logs on Retail PS4 Console, MemPatch Payload ELF
This weekend PlayStation 4 developer @zecoxao shared a guide inspired by this code to enable more logs on retail PS4 1.76 consoles with help from @oneman123 aka z80 complete with a MemPatch payload and ELF for Hitodama's Playground. 
Download: mempatch.zip (18 KB) / mempatch_retail.elf (68.33 KB)
To quote from zecoxao: How to Enable More Logs on Your Retail Console Tutorial
Credits to:
z80 (https://twitter.com/ZiL0G80) for finding the patches to enable more UART | /dev/klog logs on his console
You will need:
Download: mempatch.zip (18 KB) / mempatch_retail.elf (68.33 KB)
To quote from zecoxao: How to Enable More Logs on Your Retail Console Tutorial
Credits to:
z80 (https://twitter.com/ZiL0G80) for finding the patches to enable more UART | /dev/klog logs on his console
You will need:
- Retail Payload
- elfldr / extreme-modding.de playground's elf loader (elf loading)
- UART Soldering Skills / FTP Server (to grab logs from /dev/klog)
- PS4 on 1.76
- Fire up your own elfldr or extreme-modding.de one (it needs to go all the way to step 5 without out of memory!)
- Listen to the payload:
Code:
#listener
socat - TCP:my.ps4.ip:5052- Send the payload:
Code:
#sender
socat -u FILE:path/to/mempatch_retail.elf TCP:my.ps4.ip:5053- Launch a game or a system app
- [Extra UART] If you have UART connected, listen to the logs while the game or app is being loaded
- [Extra klog] If you're not a soldering guy, just grab the...
PS4 External USB HDD on PSN Account Used Across Multiple Consoles
Recently we reported that 4.50 PS4 Sasuke Beta Firmware users were Limited to one External USB 3.0 HDD, and now we also have confirmation from Beta testers that PS4 External USB hard disk drives tied to a PSN account can be used across multiple PlayStation 4 consoles without having to reformat it. 
To quote from PSNation.com: Here's what I've learned so far about what you can and can't do with this additional storage:
To quote from PSNation.com: Here's what I've learned so far about what you can and can't do with this additional storage:
- The new external drive becomes the default location for application data for any game that you install from disc or the PSN
No application data can be transferred from the internal to external drive, so if you already have something installed on the internal drive, you must delete it then reinstall- *UPDATE* You CAN move applications and games to the external drive, it’s just kinda hidden! Go to Settings > Storage > System Storage > Applications > then hit Options and select ‘Move to Extended Storage’. It even allows you to move multiple items at a time, which is a welcome feature. The moves can take a little while depending on the size, so maybe do this before you go to bed some night (Thanks to Thomas Harrison-Lord for the tip!)
- There’s a menu option allowing you to switch the default application data location back to the internal drive
- Screenshots and Videos from Share can’t be saved on external storage, they will only go to the internal drive
- The drive can’t be used for anything else once it’s setup, unless you reformat it obviously
- The drive can be moved to another PS4 tied to the same account without needing to reformat it (info below)
- The drive cannot be used under someone else's account (screenshots below)
- First, when you want to move the external drive to another PS4, make sure that you remove it correctly. Hold the PS Button, and go to the Devices selection at the top of the Quick Menu. Choose “Stop Using Extended Storage” so that it...
- PS4 Fake PKG (FPKG) Sharing Guide
- 6.XX Webkit / 6.72 PS4 Jailbreak
- 7.00-7.02 Webkit Exploit
- 7.02 Webkit / 7.02 Kernel / PS4JB
- 7.50 Kernel Exploit / PS4JB 7.55
- 7.55 / 8.00 Payloads / PS4JB2 7.55
- 9.00 PS4 Webkit Exploit
- 9.00 PS4 Payloads / GoldHEN (Latest)
- 9.00 PS4 Jailbreak Kernel Exploit
- 11.00 PS4 Jailbreak Kernel Exploit
- 13.00 PS4 Kernel Exploit / 13.02 BD-J Bug
- 4.03 PS5 Webkit Exploit
- PS5 Kernel Exploit (ExFAT Bug)
- PS5 Root Keys Obtained
- 4.03 PS5 Kernel Build String
- 4.03 PS5 Webkit Execution
- 4.03 PS5 Kernel Vulnerability
- 4.03 PS5 Filesystem Dumps
- 4.51 PS5 BD-JB Sandbox Escape
- PS5 BD-JB Exploit Hack Source Code
- Mast1c0re PS5 Userland Exploit
- PS5 Kernel Access via PS4 Exploit
- PS5 exFAT Vulnerability Disclosed
- 4.03 PS5 Kernel Exploit Webkit ROP
- 4.50 PS5 Kernel Exploit Webkit ROP
- 4.51 PS5 Kernel Exploit Webkit ROP
- 4.xx PS5 Kernel Exploit v1.01
- 4.xx PS5 Kernel Exploit v1.02 / v1.03
- PS5 1.00-6.50 Firmware Webkit
- Native PS5 ROP Chain Execution
- Mast1c0re PS5 Compiler Attack
- PS5 FreeBSD Kernel Bug & WebKit
- PS5 UMTX 2 Exploit & PS5 Jailbreak
- Byepervisor PS5 Hypervisor Exploit
- Lua Lapse PS5 Kxploit & Laps3c0re / Y2JB
- 12.00 / 12.70 PS5 Kernel Exploit